Packet Analysis with Wireshark in Kali Linux

Before completing this lab, ensure you are working in a legal and safe environment. If you haven't already, you can set up your own hacking lab by completing our first tutorial:
Setting Up Your Free Virtual Hacking Environment
Now we are going to learn one of the most important networking tools in cybersecurity:
Wireshark
And honestly, Wireshark is one of those tools that completely changes how you understand networks.
Because once you start looking at packets directly, you realize:
The Network Tells You Everything
Wireshark allows you to:
- capture traffic,
- inspect packets,
- analyze protocols,
- investigate communications,
- troubleshoot problems,
- and understand how systems talk to each other.
This is one of the most valuable skills in cybersecurity.
What Wireshark Actually Does
Every device on a network constantly sends and receives packets.
Packets contain:
- source addresses,
- destination addresses,
- protocols,
- requests,
- responses,
- headers,
- and data.
Wireshark captures those packets and displays them in a readable format.
This allows analysts to inspect network activity in detail.
Our Lab Setup
We will continue using:
- Kali Linux = analysis machine
- Metasploitable = target machine
This gives us a safe environment to analyze network traffic.
Step 1 – Start Both Virtual Machines
Open VMware.
Start:
- Kali Linux
- Metasploitable
Wait until both fully boot.
Log into Metasploitable with:
Username: msfadmin
Password: msfadmin
Step 2 – Find The Metasploitable IP Address
Inside Metasploitable, run:
ifconfig
Look for the IP address.
Example:
192.168.182.130
Write this IP down.
Step 3 – Verify Connectivity
Inside Kali Linux, open the terminal.
Ping the target:
ping TARGET-IP
Example:
ping 192.168.182.130
If replies appear, the systems can communicate.
Press:
CTRL + C
when finished.
Step 4 – Open Wireshark
Inside Kali Linux, open Wireshark.
You can launch it from the applications menu.
Or from terminal:
wireshark
Wireshark may request elevated permissions.
Allow it if prompted.
Step 5 – Understanding Network Interfaces
When Wireshark opens, you will see network interfaces.
Examples may include:
eth0
lo
ens33
Your interface names may differ.
The important thing is selecting the interface handling your VM traffic.
Usually this is:
eth0
or:
ens33
Step 6 – Start Your First Packet Capture
Double-click your active interface.
Wireshark will immediately begin capturing packets.
At first, the screen may look overwhelming.
That is normal.
Networks generate huge amounts of traffic constantly.
Step 7 – Generate Traffic
Now let’s create some traffic.
Inside the Kali terminal, run:
ping TARGET-IP
Example:
ping 192.168.182.130
You should now see ICMP packets appearing inside Wireshark.
Stop the ping after several seconds:
CTRL + C
Step 8 – Stop The Packet Capture
Inside Wireshark, click the red stop button.
Now we can inspect the captured traffic.
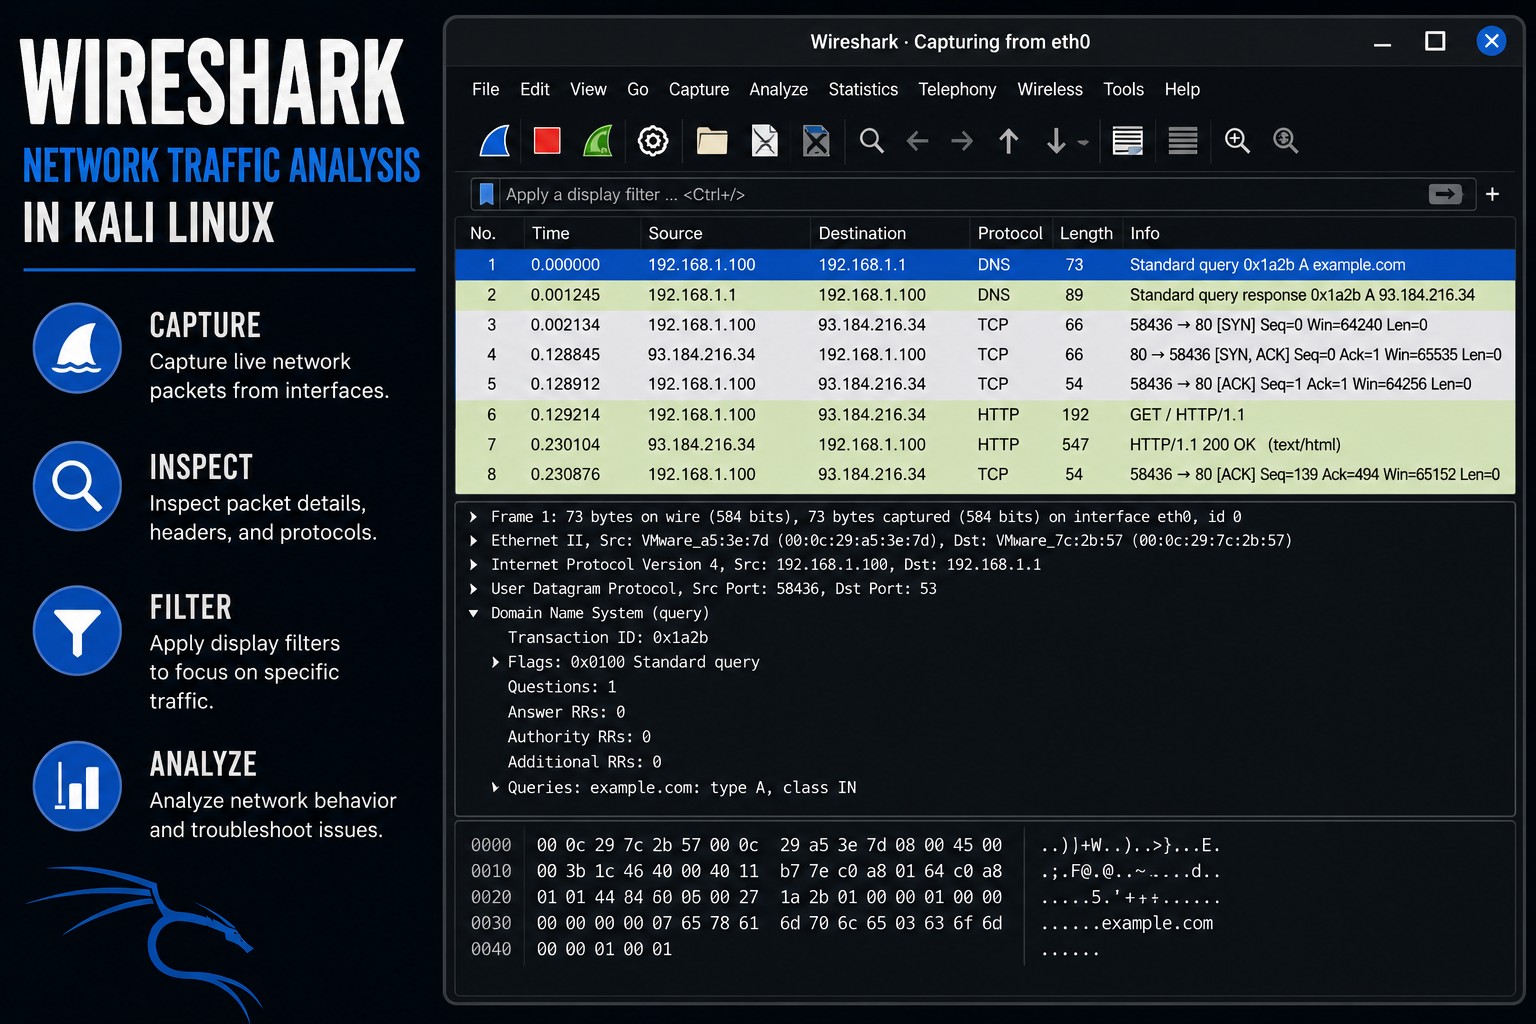
Step 9 – Understanding The Wireshark Layout
Wireshark has three main sections.
Packet List
Top section.
Shows:
- packet number,
- source,
- destination,
- protocol,
- and summary.
Packet Details
Middle section.
Shows protocol breakdowns.
Packet Bytes
Bottom section.
Shows raw hexadecimal packet data.
Step 10 – Understanding ICMP Traffic
Click one of the packets labeled:
ICMP
These are ping packets.
Expand the packet details.
You will see information such as:
- source IP,
- destination IP,
- protocol details,
- packet size,
- request type.
This is how analysts inspect communications.
Step 11 – Understanding Protocols
Wireshark can analyze many protocols.
Examples include:
| Protocol | Purpose |
|---|---|
| HTTP | web traffic |
| HTTPS | encrypted web traffic |
| DNS | domain lookups |
| ICMP | ping traffic |
| TCP | reliable communication |
| UDP | fast communication |
| FTP | file transfer |
| SSH | secure remote login |
Understanding protocols is critical in cybersecurity.
Step 12 – Use Display Filters
Without filters, captures become chaotic.
Wireshark filters help isolate traffic.
Example:
icmp
Type this into the filter bar and press Enter.
Now only ICMP packets appear.
Step 13 – Filter By IP Address
To filter traffic involving a specific host:
ip.addr == 192.168.182.130
Replace the IP with your target IP.
This isolates traffic related to the target.
Step 14 – Capture HTTP Traffic
Now let’s generate web traffic.
Inside Firefox, visit:
http://TARGET-IP
Example:
http://192.168.182.130
You should now see HTTP packets in Wireshark.
Step 15 – Filter HTTP Traffic
Use the filter:
http
Now only HTTP traffic appears.
Click one of the HTTP packets.
You may see:
GET /
Host: 192.168.182.130
This is a real web request.
Step 16 – Follow A TCP Stream
Right-click an HTTP packet.
Select:
Follow → TCP Stream
This reconstructs the full conversation between the browser and server.
This feature is incredibly powerful.
Because now you can observe:
- requests,
- responses,
- headers,
- and content.
Step 17 – Understanding DNS Traffic
When websites are visited, DNS lookups often happen first.
Filter DNS traffic:
dns
DNS converts domain names into IP addresses.
Understanding DNS matters enormously in cybersecurity.
Step 18 – Understanding TCP Handshakes
TCP connections use a process called:
The Three-Way Handshake
This includes:
SYN
SYN-ACK
ACK
Wireshark makes these connections visible.
Filter TCP traffic:
tcp
This is foundational networking knowledge.
Step 19 – Save Packet Captures
Professional analysts save captures.
Inside Wireshark:
- Click:
File → Save
Packet captures use the format:
.pcap
These files can later be reopened and analyzed.
Step 20 – Open Saved Captures
To reopen captures:
- Click:
File → Open
Then select your .pcap file.
Packet captures are extremely important in:
- investigations,
- malware analysis,
- incident response,
- and network troubleshooting.
Step 21 – Common Beginner Mistakes
Capturing The Wrong Interface
Beginners constantly select the wrong interface.
If you see no traffic, try another interface.
Forgetting Filters
Without filters, Wireshark becomes overwhelming fast.
Assuming Encrypted Traffic Is Readable
HTTPS encrypts content.
You may still see metadata, but not plaintext page contents.
Ignoring Protocol Basics
Understanding networking fundamentals matters.
Tools alone are not enough.
Step 22 – Useful Wireshark Filters
ICMP traffic
icmp
HTTP traffic
http
DNS traffic
dns
TCP traffic
tcp
Traffic from specific IP
ip.addr == 192.168.182.130
HTTP POST requests
http.request.method == "POST"
Step 23 – Why Wireshark Matters
Wireshark teaches several critical cybersecurity concepts:
- packet analysis,
- networking,
- protocols,
- traffic inspection,
- communications analysis,
- troubleshooting,
- and investigation.
And honestly, strong networking knowledge separates beginners from professionals.
Because attackers, defenders, analysts, and administrators all rely heavily on understanding network traffic.
Closing Thoughts
Wireshark is one of the most important networking tools in cybersecurity.
And once you start using it regularly, you begin understanding networks in a completely different way.
Because now:
- packets become visible,
- requests become understandable,
- protocols become recognizable,
- and communications become traceable.
This is foundational knowledge for:
- penetration testing,
- malware analysis,
- blue team operations,
- incident response,
- threat hunting,
- and network defense.
In the next tutorials, we will continue exploring Kali Linux tools, authentication testing, web application vulnerabilities, and penetration testing concepts inside our hacking lab.
Please Subscribe to keep up with future tutorials, and always feel free to contact me or leave a comment below.